Thursday, September 12, 2024

Fun Center Flip Card


A fun center flip card. This is such an elegant design - inspired by a Sue Campfield post on pinterest. 


I will provide measurements for the center flip card below. I used the Forever Fern stamp set for these cards. 


We made these at my last card class workshop. 


Center Flip Card instructions: 
  • Card base White CS at 4 1/4" x 5 1/2". Patterned paper two strips approximately 1.5" x 5 1/2". 
  • Center Flip White CS 11" x 2 15/16".
  • Embossed piece for front of center flip White CS 2 1/2" x 5 1/2" embossed with folder of choice
  • Miscellaneous die cuts to apply to front of center flip. 
To make the card adhere the two strips of patterned paper to outside edges of 4 1/4" x 5 1/2" piece of white CS. Fold the 11" x 2 15/16" piece in half at the 5 1/2" mark and this will become the center flip. Adhere the backside of the center flip to the card base, the edges overlapping the patterned paper slightly. Then add embossed 2 1/2" x 5 1/2" piece to font of center flip and any other die cuts and sentiments. I used images and die cuts from Forever Fern bundle for the foliage, and the Stitched Nested Labels dies. Sentiments are from Unbounded Love stamp set. 


Friday, August 2, 2024

Poppies 2


For this card I used blending brushes to apply ink in strawberry slush and tangerine tango. Used SU stencil and applied lunar paste in Guppy (bright orange color). The poppies were stamped in memento black ink, then stamped background swash with watermelon wonder. Colored over poppies with alcohol ink markers. Used gold EP for sentiment "there's no one quite like you" from the retired "thanks a bunch" set.
 

Jungle Pals Case


I CASE'd this card from the SU sale a bration brochure for the Jungle Pals set. So easy and fun! I used the sentiment "wild about you" from the retired Animal Outing stamp set. It was for a card workshop. Alligator is colored with Parakeet Party Stampin Blends pens.
 

Thursday, July 25, 2024

Embossed Birthday


Another card we made at a card workshop. Super simple happy birthday card for him or her. For the embossed happy birthday card, I slid the ink pads against the flat side of embossing folder (the side where the lettering isn't raised) and then embossed a white piece of cs. Added another embossed piece of white across the bottom and then tied the twine and added let's celebrate you tag. 
 

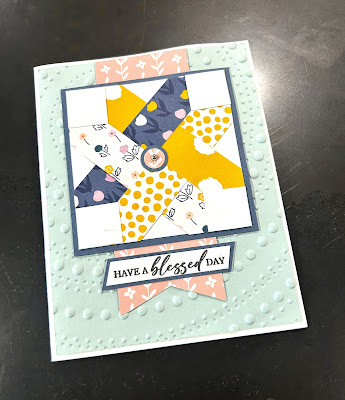
Star Quilt Card


We made this star quilt card at my last card workshop. It's a fun quilt technique, and a great way to use up paper scraps! 


Measurements:

  • Card base:  8 1/2 x 5 1/2
  • Background panel: 4 x 5 1/4 embossed with dotted circles
  • Square background mat: 3 1/4 x 3 1/4
  • Square base for quilt pattern: 3 x 3
  • Quilt strips: 3/4 x 6 (four) pieces of patterned paper
  • Quilt corners: 3/4 x 3/4 (four) white squares
  • Center background banner: 1 3/4 x 6 
For the assembly of the star quilt, layer two pieces of pattern paper diagonal to corners, letting ends overlap your white square. Now only glue the ends on one corner because you will need to weave your paper through on the next set. Layer two strips opposite corners and weave through strips already placed down. Once you have all strips lined up corner to corner and weaved through, you can glue all ends down. Turn piece over and cut off overhanging ends. Then glue the 3/4 x 3/4 white squares in each corner to create the star. You may add circles or gems to the center piece. 

The Have a blessed day sentiment is from Unbounded Love stamp set.