Showing posts with label quilt card technique. Show all posts

Thursday, July 25, 2024

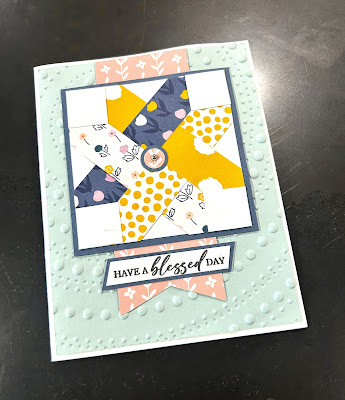
Star Quilt Card


We made this star quilt card at my last card workshop. It's a fun quilt technique, and a great way to use up paper scraps! 


Measurements:

  • Card base:  8 1/2 x 5 1/2
  • Background panel: 4 x 5 1/4 embossed with dotted circles
  • Square background mat: 3 1/4 x 3 1/4
  • Square base for quilt pattern: 3 x 3
  • Quilt strips: 3/4 x 6 (four) pieces of patterned paper
  • Quilt corners: 3/4 x 3/4 (four) white squares
  • Center background banner: 1 3/4 x 6 
For the assembly of the star quilt, layer two pieces of pattern paper diagonal to corners, letting ends overlap your white square. Now only glue the ends on one corner because you will need to weave your paper through on the next set. Layer two strips opposite corners and weave through strips already placed down. Once you have all strips lined up corner to corner and weaved through, you can glue all ends down. Turn piece over and cut off overhanging ends. Then glue the 3/4 x 3/4 white squares in each corner to create the star. You may add circles or gems to the center piece. 

The Have a blessed day sentiment is from Unbounded Love stamp set.
 

Wednesday, March 6, 2024

Quilt Card Template

Hello. I came across a posting for this fun quilt card and I thought I would share the process with you. It is such a great way to use up paper scraps! 

What you need: 

  • 8 1/2' x 5 1/2' for card base
  • 4" x 5 1/4" background panel piece (in my case I used gray)
  • (2) 1" x 5 1/2" strips of patterned paper
  • (11) 1" x 4" strips of patterned paper 
You could get away with less than the 11 pieces because you will only be using only a small corner or an inch or so on some of the pieces. 

Place your background panel down and begin by adhering the two longest diagonal pieces  - okay to let the edges overhang the panel. From there, use the template below to see placement of the remaining pieces. Just get the placement right with a small revealed border around each piece that you adhere. Don't worry about the overhanging edges - once all are attached, you will trim the edges down to the size of the background panel. Easy peasy!


This cute sentiment came from the Perennial Postage set item # 162598 in the mini catalog. To shop now: 
https://www.stampinup.com/?demoid=2264627